
"KL7BOB Field Day Antenna-5 Bands with a tuner."
Views expressed in this Amateur Radio Antenna post are those of the reporters and correspondents. Accessed on 21 June 2023, 2319 UTC. Content provided by "https://hamuniverse.com."
Source: https://www.hamuniverse.com/kl7bobfielddayant.html ("KL7BOB Field Day Antenna-5 Bands with a tuner."
Please click link or scroll down to read your selections.
Russ Roberts (KH6JRM).
If you need a simple, inexpensive multiband HF antenna for the ARRL Field Day, please try this design from former amateur radio operator Robert Richie (ex-KL7BOB).
The antenna is inexpensive and easy to build--a perfect match for home and portable stations.
KL7BOB Field Day Antenna
5 Bands with a Tuner!
The photos in this article show an antenna I made for field day and erected as a NVIS inverted V. It was used on 5 hf bands with a tuner.
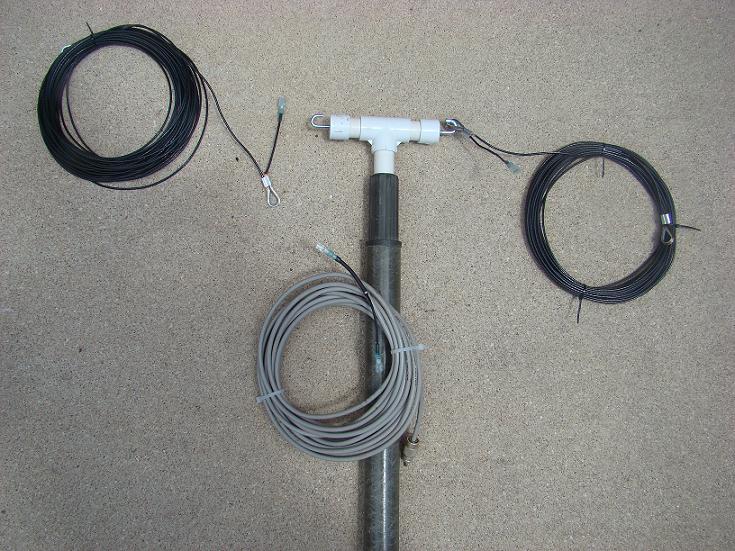
The apex was at 20 feet and the ends were 10 to 15 feet above ground. We worked 15m, 17m, 20m, 40m, and 80m using an LDG Z100 autotuner and a Kenwood TS 450 transceiver powered by a standalone 12 v marine battery. The dark pipe is a 4 foot section of fiberglass pipe and the white pipe and fittings are 3/4" PVC.

Here is a parts list for the center fitting (insulator) shown above:
3/4 " PVC pipe ~1 foot
3/4" PVC pipe caps 2 ea
3/4" PVC Tee 1 ea
3/16" x 1-1/2" "J" hooks w/ 2nuts 2 ea
3/16" flat washer 4 ea
3/16" lock washers 4 ea
PVC cement
Cut 2 pieces of 3/4" PVC pipe about 2" long and one piece about 8" long. Drill a 3/16" hole in the center of each pipe cap. Insert the threaded end of the J hook into the hole in the pipe cap and install a flat washer, a lock washer and a nut on the inside and outside of each pipe cap. Cement a 2" piece of PVC into each side of the T and cement the 8" piece to the bottom. Cement the pipe caps to the exposed ends of the PVC nipples making sure the hooks point up.
Photo below:

The legs of the dipole are not critical in length if you use a tuner. I cut mine to be resonant about 3850 (60 feet.) I used 14 ga stranded, insulated copper wire and installed a thimble and ferrule at each end. On one end strip 8" of insulation and on the other strip just enough insulation to install the thimble and ferrule. On the side to be connected to the coax leave the surplus stripped wire extending from the ferrule. Place a piece of heat-shrink tubing over the exposed wire. Place a heat shrink shrouded disconnect onto the end of the wire and crimp it closed. With a heat gun or hair dryer shrink the tubing snugly to the wire. You will need to make two of these legs the same length.
Strip about 4" from the end of a desired length of coax and separate the shield from the center conductor. Twist the shield and place a piece of heat shrink tubing over it. Place a heat shrink shrouded connector and crimp it closed. Likewise place a piece of heat shrink tubing over the center insulator of the coax and crimp a connector on the center conductor. Heat the tubing and connectors with a heat gun or hair dryer to complete the job.
You'll need the following hardware to construct the antenna legs:
14 ga stranded, insulated wire - 2 pieces 60 feet long
Cable thimbles 4 ea
Ferrules for crimping 4 ea
Heat-shrink tubing
Heat shrink shrouded male connectors 2 ea
Heat shrink shrouded female connectors 2 ea
===================================
There are many variations for this antenna that can quickly be made.
Hook the ends with the pig tail to the J hooks and connect to the coax. You can use any connector you want, I just found the slip connectors locally.
A number of variations for this antenna can quickly be made.
First, you can cut the dipole to suit your specific needs.
Second, you could make an off-center fed dipole like a Carolina Windom.
Third, you could make the legs longer and bolt the ends together to make a loop. I have since added an eyebolt to the top of the T so it can be suspended from a tree limb or hoisted up a flag pole. I used 3/16" braided nylon or bungee cords to secure the outboard ends of the antenna.
The advantage to the antenna is that you can wrap the legs and coax of the system separately so it is easier to pack. Also by varying the lengths of the legs you can have a custom antenna by assembling different components.
Have fun playing with it. KL7BOB, Bob.
Editor notes:
This is for the "newbies" out there.....As with all homebrew construction,
you do not have to follow the exact methods Bob used for building this antenna.
If some parts that are listed in the article are not easy to get, then just use your "ham imagination and common sense skills". You will also notice in Bob's article, no mention of a power level OTHER than the output of a transceiver was used! Using power levels exceeding 100 watts may harm your tuner due to high swr on some bands.
Experimenting with antennas and their construction is what the fun of antenna building is all about.

Scan Police, Fire, Rescue, Ham Radio, Aircraft, Ships, and much more!